To upload HTML5, xAPI, SCORM 1.2 and SCORM 2004 Adobe Captivate content package on WordPress. You can follow this step by step guide.
To upload your content on your WordPress website, you have to export your content with the right settings. First, we will check the requirements and then move to the right export setting.
Table of Content
Requirements
- WordPress Website
- Adobe Captivate Content
- Plugin: GrassBlade xAPI Companion
- GrassBlade Cloud LRS or GrassBlade LRS for tracking. (required only if you want reporting/tracking)
Export Content with xAPI/Tin Can Reporting
This method is for those, who want to track user interaction data of the xAPI Content. We are using xAPI / Tin Can settings as it is latest LMS Standard for tracking and way better than others.
Step 1
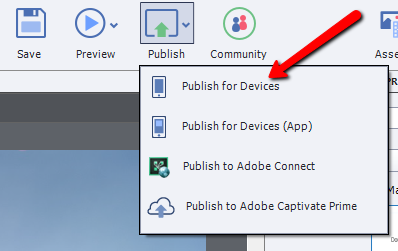
Click the Publish button and select “Publish for Devices”.
Step 2
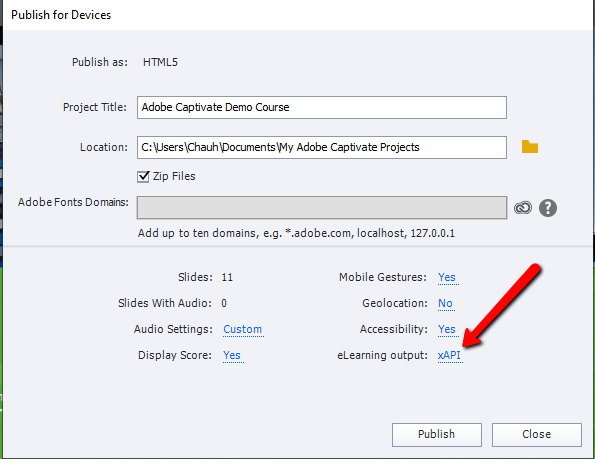
Select eLearning output for tracking.
Step 3
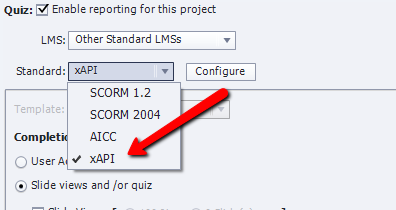
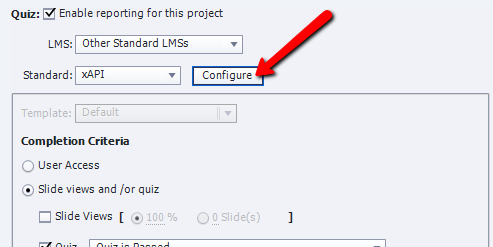
Under LMS select Other Standard LMS’s and Select Standard as xAPI.
Step 4
Click Configure, for xAPI settings.
Step 5
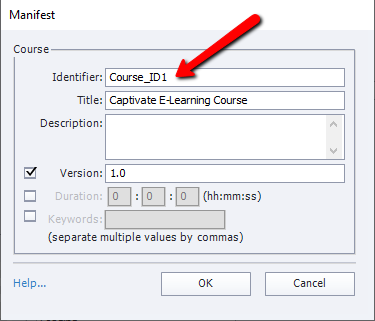
In the Identifier field, enter your content identifier. This is usually a short name or content number. Do not use spaces, but use underscores or dashes between words if needed.
This is the field the GrassBlade LRS will use to track your xAPI Content statements, so make sure it is unique. If you use the (random) default ID, it will work but will be difficult to identify your xAPI contents in the LRS statement list. Click ok to save the settings
Note: If you update your xAPI content in the future, make sure you use the same Identifier when you update your xAPI content.
Step 6
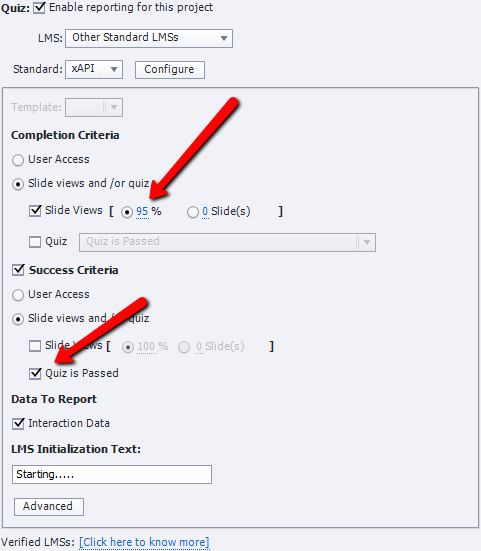
Specify the success and completion criteria for your xAPI Content. The status of the xAPI Content is decided based on whether users met these criteria.
Recommended Settings for Content with Quiz
In Captivate, you can set passing or completion criteria in different combinations. We have tested almost all possible sets of combinations for completion and success. Here are the best settings you can do for your tracking purpose. Set:
- Completion: 100% Slides
- Success: Quiz is Passed
Note: If you have a large content (Example: 100+ slides), then set completion criteria less than 100%. Due to some bug, lag or glitch, sometimes completion criteria do not meet, so it won’t mark the content as completed.
This will send statements in LRS as Passed or Failed based on the learner’s performance.
In the passed or failed statements, you can see completion and success changing in different scenarios. When use viewed all the slide and
user is passed in the quiz:
- completion: true
- success: true
user is failed in the quiz:
- completion: true
- success: false
Recommended Settings for Content with only slides
When the user has only slide as content, then you get details like experienced when the learner views a slide. As we’re always concerned about Did the user checked all the slides?
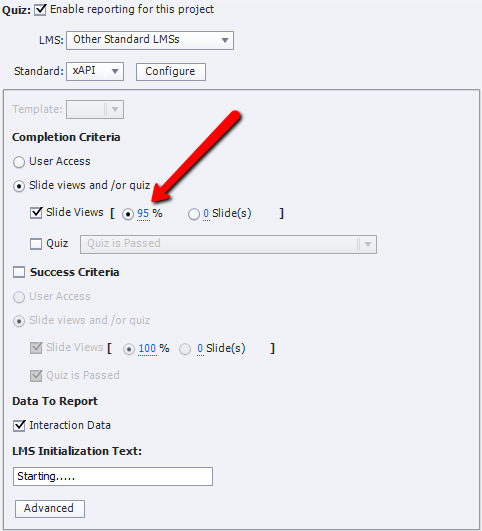
Then we’re expecting a completion statement at the end when the user checked the whole or at least set percentage of slides. For completion statement set:
- Completion: 100% or less
- Success: N/A
Note: Success settings are for the quiz, you do not need success criteria when you have only slide in content.
When,
- Users view all slides or meet the set criteria you will get completed statement in your LRS.
- The user left the content slides in the middle or do not complete it and leave the page. You will get an attempted statement.
Note: User will be resumed from where he left and once he reaches the view threshold content will be marked completed automatically.
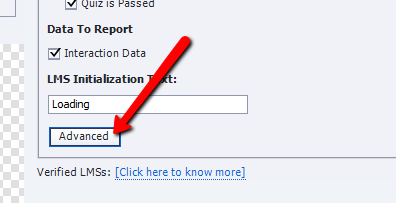
Step 7
Click Advanced for a few optional settings.
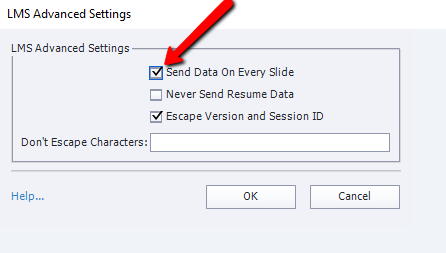
Step 8
Select appropriate options in LMS advanced settings. If you want to get interaction details after every slide, then select Send data on every slide option.
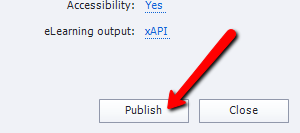
Step 9
Now save all the settings and click Publish button.
Export Content with SCORM Reporting
GrassBlade xAPI Companion also supports SCORM 1.2 and all the editions of SCORM 2004. However, we recommend exporting your content as an xAPI package for better reporting and future requirements.
If you still want to export with SCORM reporting settings, just replace following settings with these options in the above process.
Recommended settings for SCORM 1.2
Step 3:
Select LMS Standard as SCORM 1.2
Step 4:
From Status Representation settings, select Incomplete –> Passed/Failed for content having a quiz and you want success criteria “Quiz is passed”. If there is no quiz only slides then select Incomplete → Complete option.
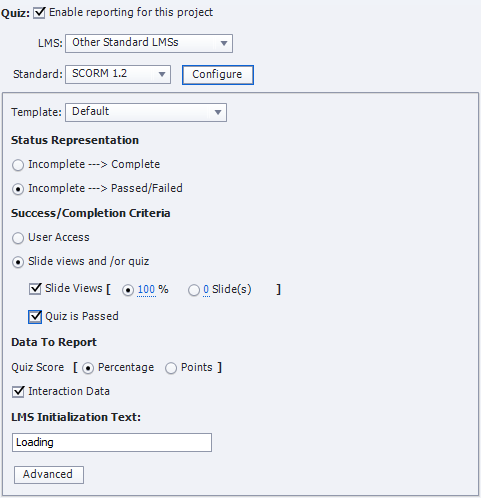
Now follow the above process to complete the export process.
Recommended settings for SCORM 2004
Step 3:
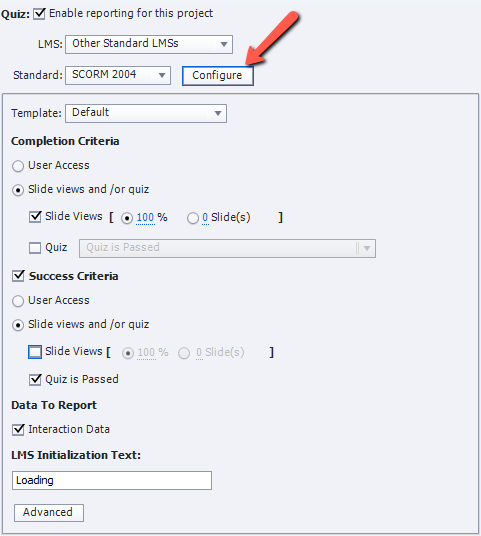
Select LMS Standard as SCORM 2004 and click the Configure button.
Step 3a:
On this screen, select the Edition of SCORM 2004.

Now you can follow the process given above to export package with quiz or slides based completion reporting.
Export Content Without Reporting
This method is for those, who do not want tracking or reporting, just want to upload their xAPI Content on WordPress. This way you do not need a Learning Record Store. Just install GrassBlade xAPI Companion plugin and upload your xAPI Content on the WordPress. Follow the steps to export your xAPI Content:
Step 1
Click Export and select Export for Devices.

Step 2
Click Elearning output, for disabling reporting features. (By default it is disabled.)

Step 3
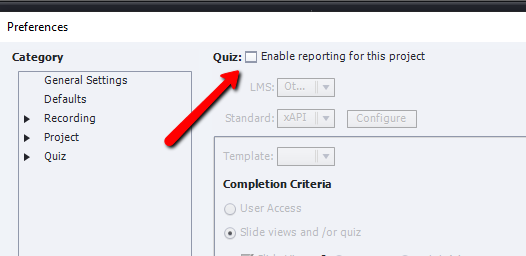
Make sure Enable Reporting for this project is unchecked. (Disable it)
Step 4
Now save all the settings and click the Export button.

Upload Content
To upload your exported HTML5, xAPI or SCORM Content zip file on WordPress, read available upload methods.
If you need help with installing GrassBlade xAPI Companion plugin, click here.
I hope you find this information useful. If you’re facing any issues, please feel free to contact us.
